How to create a great looking water effect on your gaming bases using 2 part Epoxy that will look like this:


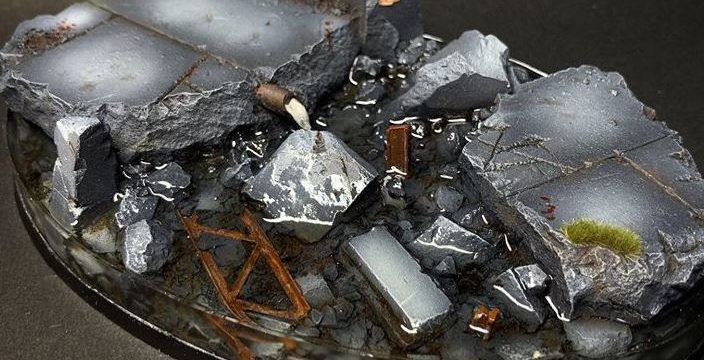
Pre-waffle:
I’d looked into 2-part epoxy resin a few times but it all seemed pretty daunting – What resin to use? How do you mix it properly? How do you color it? How do you remove the air bubbles? How do you dam the edges properly? How do you get the edges looking clear? How do you make the water look like it’s moving? And so on… A load of questions combined with the fact that there seemed to be a low margin for error meant I always put it down to being well outside my hobby-skill level.
That was until I recently bought a Cerastus Knight Lancer from Forgeworld. The plan was for it to be a center piece for my House Mortan Knight army so wanted to give it a fancy base that would make it really stand out.
With that in mind I picked up an awesome resin scenic base from Unreal Wargaming Studios. I highly recommend these guys for anyone who wants to level up their basing game. The base is fine as it comes, but I thought the recessed area in the middle with a little outlet pipe really lent itself to a “flooded ruin” scene!

So with a rough idea of what I wanted to do, I spent the next couple of weeks reading up and watching countless YouTube videos on water effects – how to use two part epoxy resin pours, still water effects, UV hardened resin, how to polish resin and various other modelling techniques for creating a realistic look. There is tons of fantastic content available online (by hobbyists far more experienced and skilled than myself!) which you should definitely check out, but the idea of this guide is to try and condense that great info into a short guide and combine it with my own experience and tips. Suffice to say, if I can do it anyone can!
I mentioned a few different types of products above and they all have their place, but for this tutorial we will specifically focus on Epoxy 2 part resin and the application of a clear gel over the top to achieve a ‘moving water’ effect. I experimented with a number of other products such as ‘Vallejo Stillwater’, but for slightly larger bodies of water I found that the 2 part resin gave the best results.
What will you need?
You can definitely get the resin much cheaper, but I’d read that the AK Resin water was highly recommended so went for that. The base itself was £17 delivered and when you add everything else, it’s not particularly cheap, but you will of course have enough material left over for multiple uses. Once I get a bit more experience I’ll probably try some cheaper resin makes and see how they come out.
- A base
- 2 part Epoxy resin. I used AK Interactive Resin Water 2 Part Epoxy 375ml. – £30k Amazon.
- A4 polystyrene/plasticard sheet – 0.25mm (I got a 5 pack from Ebay for £3)
- Tape (I used Tamiya masking tape as was to hand but any strong tape should suffice)
- Vallejo ‘Transparent water’ gel. (200ml was £8.99 on ebay).
- 3 clear disposable pots. (I just used what I had available but any plastic cups or pots will suffice).
- Stirrer (I used coffee stirrers from Costa)
- Ink to tint the water (I used Army Painter “soft tone” wash)
- Modelling Files (Mine were a set of 10 from ebay for £5)
- Sharp modelling knife
- Kitchen scales
Step 1 Prepare your base
It’s worth mentioning at this stage that all of the tutorials I saw online had the resin/water go flush to the bottom of the base therefore ‘losing’ the black GW base edge/lip. That still looks great, but I wanted the ‘water’ to start from the top of the base so still displaying the original base edge below it:

The key step here is to make sure that you don’t have any basing material poking outside of the circumference of the top of the base as that’s going to screw up your ‘dam’ later on.
Ideally you want to be leaving a tiny (0.25mm – the thickness of the plasticard) gap all around the edge where your water is going to be so that the plasticard sits nice and flush when it comes to the damming stage.
You can cut a strip of the plasticard off to the depth of you pour at this stage to wrap it around the top edge of the base. If once you’ve done that you have a rogue rock sticking into the card, or it’s bending out of shape to accommodate a Tau torso (the only acceptable corpse imho) then you’ll have lots of bother later down the line.
Remember that you aren’t wrapping the card tight against the slanted edges of the base otherwise it will come in at an angle. By starting at the top edge you’ll get a nice ‘straight’ finish regardless of the size of the base. You may need to do some filing or cutting of the basing material, but it’s definitely worth taking your time and getting this right. Put the plasticard strip to one side as you’ll need that for later (try to avoid getting any dirt, paint or grease on it).
Once you are happy that the dam isn’t going to be obstructed and everything is trimmed/filed as necessary you can get painting and add anything you want sitting in the water. Just remember to fix that shopping trolley\orc head\caravan down otherwise it will float to the top when you start pouring the resin in! You can also use weathering poweders/pigments without any untoward effects.
Step 2 Creating the dam
Before I started out this was the part that daunted me the most.
I saw all sorts of methods online ranging from placing the base into silicone cake molds, to double sided tape to custom 3D printed ‘rings’ that slot over the base. I had no real idea of what resin would or wouldn’t stick to so was pretty apprehensive about getting it right. In the end it was actually surprisingly simple!
Take your plasticard strip and tape it so it is sitting flush on the edge of the base. Tape it vertically in place lightly at first and re-check that there isn’t anything pushing against it. When you are happy apply additional horizontal strips of tape all around the base/plasticard so that it is tightly in place. I’ve seen people use glue guns to seal the tape for extra piece of mind, so by all means do that if you like but I didn’t bother. Just make sure that the bottom edge of your plasticard is sitting flush against the top edge of your base (which it will as you have properly prepared the base in Step 1 ) and that you have applied a liberal amount of tape all around the edges and tucked up underneath.


Step 3 Preparing the resin
Like in the other steps, good preparation and patience is key to getting the best result here so don’t rush! The resin I used is a 2:1 mix of Resin to hardener. Stick some old paper down and if you have a pair of disposable latex gloves pop them on as you ideally don’t want this stuff on your fingers/cloths/carpet etc.
I put the first plastic cup onto the scales and measured out 70mg of resin. I then measured out 35mg of hardener into the second cup using an old plastic syringe and carefully poured them both into a 3rd container. The key point in this step is to minimize the amount of bubbles you create, so try and keep everything slow and smooth. I added 4 drops of Army Painter soft tone ink (I wanted dirty water but still clear enough so that the awesome UW base detail is visible underneath). Don’t over do the ink. Add a drop of ink then mix it in thoroughly, before adding another if required and so on. Don’t add too much at once as the resin can quickly become opaque which you definitely don’t want. Less is more.
I stirred slowly (but thoroughly) using a coffee stirrer for 5 minutes. Really scrape the edges of the container and use the stirrer to remove any of the larger bubbles that form.
Step 4 The pour
The fun but nerve wracking bit.
Firstly make sure your base is on a flat surface. This is important as you want the resin to harden to a natural level and not at a slant. You’ll want to do this on a protected surface, but make sure any paper you do put down doesn’t make the base sit uneven. Have one last check of the tape and dam and make sure that everything is pressed in nice and firmly.
Start pouring the resin in slowly at the center and then wait a few seconds, let it find its level and then continue pouring. Pour in as much as required and then use your stirrer to try and disperse as many of the bubbles as you can. You won’t get them all but that doesn’t matter. Mine mostly collected on the sides of the plasticard so I gently used the stirrer to pull them away from the edges and then popped them like the ruthless bubble popping mercenary I am. Keep checking for any leaks.
Once you’ve finish the pour, put the base somewhere which isn’t going to get knocked\grabbed\fingered and pop a container or something over the top to prevent dust or hairs getting in it.
Step 5 Removing the Dam and tape.
Make sure you leave the resin to set for long enough. The instructions with the AK resin I used didn’t actually state how long that should be, but I left mine 24 hours and the resin appeared to be rock solid. Don’t rush it though and if in any doubt just leave it another day. No point ruining all the hard work up to this point to save a few hours.
All being well, you will now have a nice smooth consistent edge to your resin. Two things to note here. 1 – the sides will be cloudy and 2 – the resin will have a lip upwards on the egde. Both of these are expected and can be sorted relatively easily in step 4

Step 6 – Finishing touches
I wanted a “moving water” effect as I didn’t think that a 200 foot Knight stomping through a ruin would be that tranquil.
So I took my Vallejo Water effect gel and started applying it fairly liberally all over the surface of the base with a brush. It’s gloopy and goes on white but dries completely clear. You can use a brush to shape the water to try and replicate any natural effects (for example I had mine flowing away from the pipe).

Once applied but still wet, you can use an airbrush and blow clean air in one direction across the top (not too hard!) so that you create more natural water movement. If you do want still water you can obviously ignore the water gel stage and just trim off the lip using a very sharp modelling knife.
The next thing you’ll notice is a big lip all around the edge of the resin, where its clung to the sides. As long as the resin has completely hardened this is easy to remove with a very sharp modelling knife. If the resin isn’t fully cured or your knife is blunt it cut cleanly so do change that blade out first! Once you’ve removed the worst of the lip you can always apply a couple of layers of the Water Gel up to the edge to lose it completely.
Next up is to get the sides looking clear. You can polish resin to a nice clear finish, but I found that a quick application to the sides of gloss varnish using a brush (once the surface water gel has dried) did a fine job and takes a 10th of the time. If you do want to polish it there are lots of guides online.


The water spashes from the pipe were just bits of cotton wool pulled from an ear bud/cue tip and mixed with the water gel then pulled into place.

So that’s about it. I hope that’s helped a few people and de-mystefied the process a little. I’ve done a few smaller bases since the Knight and been really happy with how they have come out.
You can follow my nerding journeys both here and @fingers_rfw on Instagram.