A few people have asked me how I do the chipping effects on my Admech and Imperial Knights. It’s a pretty simple process and can be achieved relatively quickly.
There are tons of videos available online that cover the steps in lots more detail (google ‘masking fluid chipping effect’), but this tutorial should hopefully give you enough information and theory to get practicing.
I am still learning myself and the results I achieve are a long way from perfect, but it’s always the part of my models that my opponents tend to comment on, so hopefully doing something right 😀
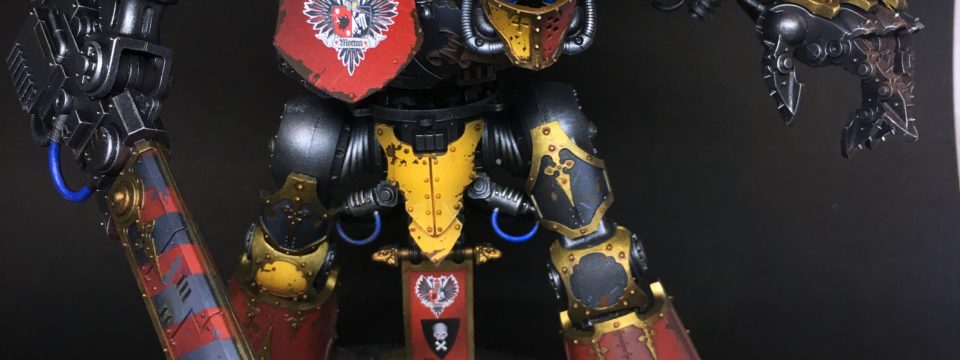
The final effect will look something like this:


Note that the steps below cover the chipping effect. You can build on this with washes and oils to create rust streaks and other damage but I won’t go into too much detail on those aspects here.
The only ‘tools’ you need will be an Air Brush, matte varnish, masking fluid/liquid mask) I use Vallejo but any will do) a sponge and some blu-tack. In this tutorial I have applied a go faster stripe to a House Mortan Helverin, so I also used masking tape.

Step 1:
Undercoat black and apply a dark brown base coat to the whole area that you want to look chipped. I generally use Burnt Umber (Valejo) or a mix of Mournfang Brown/Rhinox Hide (GW). It really doesn’t matter too much though as long as it’s a dark brownish colour.

Step 2:
Rust in real life is all different shades of brown and oranges. To try and add a bit of variety air brush on spots of lighter brown, and then Orange/brown onto random areas of the model. The idea is that the chips have a natural variation in colouring. Most of this brown will obviously be covered up by the final armour colour so don’t worry about getting it perfect.

Step 3:
Once dry apply a coat of matte varnish. Leave it to dry (or help it along with the Mrs’ hair dryer)
Step 4:
Add some masking fluid to your pallete. Break off a corner of the sponge so that you have a non-uniform bit of foam and dab into the fluid. Lightly apply to the model.
The key thing is not to do uniform shaps and sizes. Keep rotating the foam and use different edges of it to apply the fluid and press down with different pressures. The last thing you want is lots of chips all identical looking. Also give some thought to where chips might naturally occur. For example, the front of the model where it is most likely to get damaged, hatches, around feet etc. I’ve gone relatively light here but you can go to town depending on how beaten to crap the model is meant to be.

Step 5:
Once the fluid is dry it will turn transparent. It is very easy to accidentally remove it as it’s so sticky, so be careful when handling the model. When you are sure it’s completely dry (I generally leave for at least an hour) you can then apply what will be the first base coat.

Step 6:
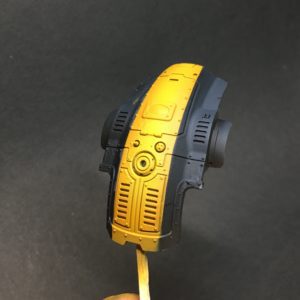
Finish painting the model as you would usually. For the carapace, I painted black and then just hit with grey using the AB at a slight angle to catch the main flat peices but avoid the angled sides. That explanation made perfect sense in my head – but hey, this is a chipping tutorial not an Air Brushing one 😀
I wasn’t fussed about spending too long on gradients of black/grey as there will be a dirty great big yellow strip down the middle.

Step 7:
If you aren’t doing any futher patterns or masking off, then you can lightly remove the dried fluid using a soft tip or blu-tac once the model is dry. Be rarely careful if you do use blu-tac not to rub too hard – it will transfer paint!
Peeling back the dried fluid is the most satisfying part, especially if you are chipping lighter colours as it has an instant impact.
I wanted a stripe on mine, so I left all the fluid on and masked off the area either side of the stripe. It doesn’t matter that the masking tape will pull the fluid off when removed as I had finished painting those areas anyway.

Step 8:
Carry on painting the model as usual. For the yellow here I used Scorfulous brown, then Sun Yellow, then Sun yellow/white mix, moving in from the outside with each layer.

Step 9:
The second most satisfying bit – removing the masking tape. Always best to be as slow and careful as possible, even if you are sure you let the model fully dry. It can be sould destroying when the tape peels off half the base coat and brown rust underneath revealing grey plastic.
Step 10:
Carfully remove all of the masking fluid once you are confident everything is dry. There are proper silicon brushes you can buy for the application and removal of masking fluid (something like this – no idea if these are any good!) but you can usually use a soft brush or as I do, very lightly blue-tac. Never let a decent brush get anywhere near masking fluid – it will ruin in.
Step 11:
From here you can add any scratches or detail to the chips as you like. Oranges always work for rust and of course various streaks of grime and oil always add to the effect.Edge highlight the yellows (with a yellow and white mix) and blacks (in grey). Add a dab of Seraphim Sepia to the rivets and then hit them with either the lighter yellow or grey depending on where they are.
I hope that this has been useful. Sounds a bit faffy, but using a hair dryer for drying, this took me around 1.5 hours to do all armour peices of the Helverin from start to finish. As I said at the top, I am by no means an acomplished painted but am trying to share progress and tips as I learn them myself.
If you do have a go it would be great to hear how you got on.
Cheers
Fingers (IG)
Awesome tutorial! This makes me want to transfer these ideas to a red and green themed knight army. I would love a run down of the red. Good luck on the next steps of your knight army. Can’t wait to see what comes next.
Thanks very much. That’s sounds a great idea! Would love to see how you get on with it.
The red is:
– Base coat black
– AB with a light grey from above to the areas that would naturally catch light (zenithal highlighting)
– AB Vallejo Gory red over the black and grey. Two or three light coats.
– AB Vallejo Bloody red to the more prominent parts.
That’s about it! Hope that helps and thanks for taking the time to read the article. Cheers
All kinds of awesome, I’m about to try this myself on my own Mortan Knights.
I was wondering if the Personal Heraldry Shield on one of your Knights was Freehand? The Transfer Sheet doesn’t have any of them on it and I’m wondering if I should try and knock some up with Photoshop and print them off on Decal paper.
Thanks for sharing, Sterling work and a great tutorial.
Thanks very much Morrison – glad you liked it. Let me know if you post any pics of your Mortan Knights anywhere online as would be great to see them! We are a rare breed on the web!
The Mortan black shields were created in Photoshop and then printed onto decal paper. Its a bit of a faff as you have to cut them out. There are companys that don’t charge too much though if you wanted to give them a go (checkout fallout hobbies). If you are keen I can mail you over the original file. The only issue I had was getting them to sit as ‘flat’ as normal decals do as they were a little thicker. Managed to sort that with a few layers of varnish.
Good luck!